
| DEMO VERSION "AUREAS ASTROLOGY v8.7" |
|
Important note: Our new website is
now
|
You
will find below the
information needed to install and use our generic Demo program, which
gives you a sample of all Aureas astrological programs, using your
natal chart data. You can print this help file out on paper --
this may simplify the process for you.
Installing the demo:
Our Version 8.7 programs work on Windows XP, Vista and Seven. If you are using an earlier version of Windows, you need to download Version 8, with instructions on the following page.
Important -- Begin by closing all open applications. You have to install the program in an Administrator account (and not a limited access account). Some antivirus software may cause problems during installation. In that case, you will have to deactivate them temporarily. See your antivirus user's guide.
Installation steps:
1. If you have downloaded the Demo version over the internet, double-click on the downloaded file: AureasDemo.exe and go to step 3.
2. If you have a CD-ROM containing our programs, the installation wizard should start automatically when the CD is inserted in the CD-ROM drive. If this is the case, go to step 3. Otherwise continue the operation as indicated next:
-- Click on the Start button and select Run. If you don't see the Run command in the Start menu, use instead the Win+R shortcut key combination (the Win key, with the Windows logo, is located on the lower left side of the space bar, between the Ctrl and Alt keys). In the window that will be displayed, type (without spaces):
D:\SETUPASTRO
(change the letter “D:” to the one assigned to your CD-ROM drive if it is different from “D”; this may be the case if you have more than one hard drive on your computer). Then click Ok to continue.-- If this procedure does not work on your computer, here is an alternate method:
Double-click on the (My)Computer icon at the upper left of your desktop screen. In the resulting window, double-click on the icon representing your CD-ROM drive (where your Aureas CD should be loaded). After the double-click, the contents of your Aureas CD will show. Now double-click on the SetupAstro file.
3. The installation begins. A first message will display indicating that you must shut down all other running programs before starting the installation of your new program. Click Next to continue.
>> A new window indicates in which directory (and disk) the program will be installed. You can change it, but we recommend that you use the directory selected by default (C:\Program Files\Aureas85) to avoid later confusion. Click on the Next button to continue, then on Install.
>> The installation procedure is validated and completed by a message indicating that the program has been correctly copied to your hard disk. A shortcut (icon) has been automatically created on the Desktop in order to make program access easier.
>> Now, you can start up your program either by doing a double-click on the Aureas v8.7 icon created on your Desktop screen, or by clicking the Start button on the bottom left of the screen, selecting All programs then the group Aureas v8.7 and the Aureas Astrology 8.7 item.
>> If a message tells you that it is necessary to restart your computer, click Yes, restart your computer, then start again the demo.
Using the demo:
Each time you start the program, the following window will be displayed:
To access the demo version, simply click on the "AUREAS Demo" button at upper right. The demo will start and display the following window:
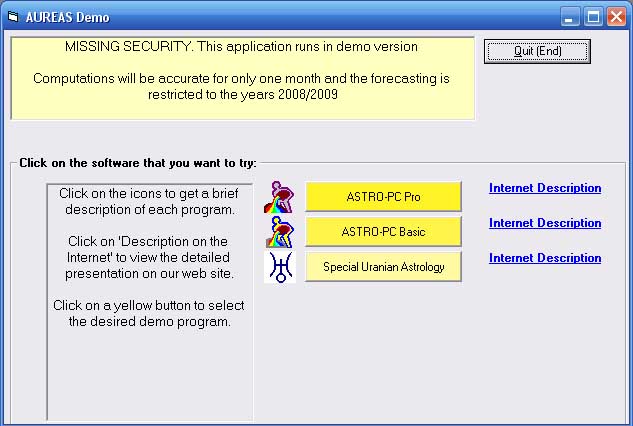
The "Missing Security" message displayed on the top means that the Demo program can be tested with only one chart, for example your natal chart. You can use most of the functions of the programs, but they will only work for the single chart whose data you input, carefully and correctly the first time. The forecasting charts -- transits, solar returns -- and the date search functions will also be restricted to the years stated in the message.
To choose which program you want to test, simply click on one of the yellow rectangles. You can obtain prior information about each program by clicking on the small icon to the left of its name (short description), or see the detailed presentation available on our website -- for this, simply click the option "Internet Description".
Input the demonstration chart data:
You can use the Demo version with only one chart. It is therefore important to enter the chart data without errors. Yet, the Demo can be installed on as many computers than you wish, with different natal chart data each time. You should enter the data for a natal chart on any single computer as though it cannot be modified any more. (You will be able to change the hour, the day, or the longitude and the latitude, but NOT the month or the year -- these are the only options available if you enter the data improperly.)
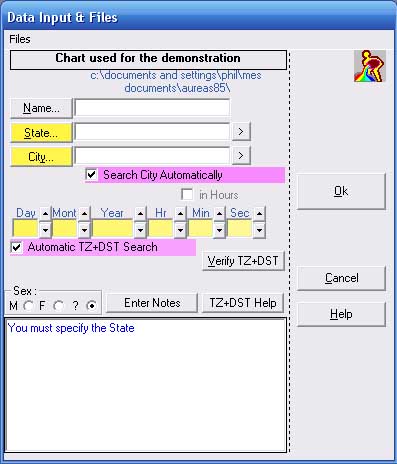
After selecting the desired program, and only the first time, a window is displayed asking you to input the birth data for the chart you wish to use for the demo.
IMPORTANT : note that the date order in the program will match automatically with your operation system settings. In the example below you see the standard European Day-Month-Year ordering, but if your computer operating system is set to the standard American order Month-Day-Year, the program will automatically reflect that date ordering.
1) Click inside the white box located to the right of the Name button and type the name you want to associate with the chart -- you can use either lower or upper case.
2)
Next, you need to choose the state or
country of birth. You can type this in the box to the right of the State button, but it must be
typed in a specific format, and until you are familiar with the
program, it is better to click the State
button, which will display the list of countries and states
available. Go down the list, with the mouse or the arrow keys, to
find the country and/or state you want, and double click on it.
This way, you can avoid errors made in typing the name of the country
or state in the wrong format. California is listed
under USA-California. New South Wales is listed
under Australia-New South Wales. British Columbia is listed
under Canada-British Columbia. IF YOU ARE NOT CERTAIN OF THE
STATE OR REGION (EAST/WEST) THEN SELECT ANY OF THE OPTIONS FOR THE
GIVEN COUNTRY, after which notes at the bottom of the window, or else
information accessible via clicking the "TZ+DST Help" button may
clarify which file is appropriate. Note that the Demo version
includes an abbreviated TZ+DST Help information file less complete than
that in the full paid version.
Another way to select the country is to
type only some letters of its name (for example: YORK) and to click on
the right of the input field on the small ">"
button. A new window will display the list of all the countries
including the characters you typed. Just double-click on the desired
country.
3)
With the mouse or the keyboard, go to the box next
to the City button and
type the name of the city of birth, or click the City
button, it will display a list of cities listed for that state,
country, or region (limited in the Demo version). Go down the list
-with the mouse or the arrow keys- to find the city you want, and
double click on it.
The Demo version includes an abbreviated atlas with fewer cities.
If the city you need is not in the list, type the name of the city in
the CITY text box, then click the ">"
button to the right, and see if it shows up in a different file for the
same state or country. If not, you will need to add the city and
its latitude and longitude to the atlas. In cases where a state
or country has more than one file (east/west/other state, etc) and you
are not certain which region to choose, click on the "TZ+DST Help" file
for more information about how files for that state or country might be
divided. If you still do not find the city, click on City, then the New
City button. You then need to enter the name, latitude
and longitude of the city and click on "OK Save"
-- NOTE, importantly, that you must make sure that N or S, and E or W
is correctly selected so that your the city's coordinates are correctly
set for North, South, East, or West.
4)
Go up to the birth information box. Here, you enter day-month-year, or month-day-year,
or year-month-day depending on your
Windows parameters that you set manually in your Windows operating
system.
Next, enter the hour, minutes and seconds of birth. Enter the time of
birth and the correct time zone. If the program shows a checkmark
before "Automatic TZ+DST Search", the program selects
a time zone automatically. If you want to set the zone manually
instead, click on that checkmark, and a window will open allowing you
to select the time zone.
Enter the time of birth as recorded on the birth certificate, or from
another reliable source, in 24-hour notation. If you are not
familiar with 24-hour notation, the international scientific and
business standard, learn now this very simple rule: For all PM births,
add 12 hours to the time indicated as PM. For instance, for a birth at
3:30 pm, enter 15h30 and not 3:30. This simple process is easy to
learn, ultimately minimizes confusion, and prepares you to become
up-to-date with international conventions. (The use of the "h" symbol, instead of : , normally indicates that
the time is in 24-hour notation).
5) Now click the Verify TZ+DST button: the application will display the date and hour of birth in Universal Time, with all time corrections included. Check the month and year of birth, and note that you won't be able to change them later!
6) You can optionally indicate the sex of the person by clicking on M or F (or leave ? if you do not need to record this data), right above the large text box at the bottom of the Data Input window.
After completing the various input fields, you will see a complete input sector similar to this one:
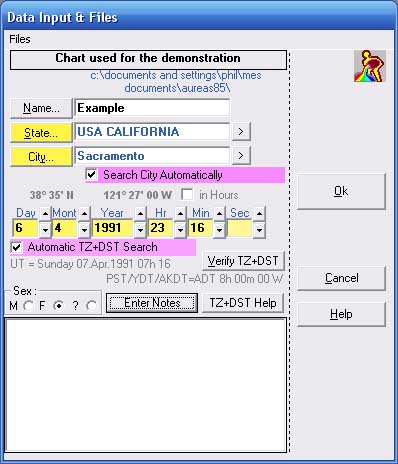
Check the data carefully and finish by clicking the OK button: the chart is saved in memory. You can then ask for the Natal chart to be displayed on the screen by clicking the Natal option on the menu bar and selecting the first line: Natal Chart. Click the Ok button in the open window: your demo chart appears on the screen. Note that the chart graphics can be changed using the functions accessible via the Options menu.
Testing the demo:
You now can use all the functions in the application -- with a few exceptions -- on the chart whose data you just entered. The forecasting functions --directions, transits, returns-- as well as the date search functions, are restricted to certain years only in the demo version.
To access all information needed to help you use the application, help files are accessible from a number of places. For example, from the Help menu, or from the keyboard: press the F1 key at any time to access information relating to the function or command you are using. Note that if you are using Windows Vista, you may be asked to download a special program to view the help files on the screen. You can download the WinHlp32.exe file, available on the following page http://support.microsoft.com/?kbid=917607, to have convenient access to the help files of our programs.
We recommend that the first time you use your application, you configure it and customize it to fit your usual astrological criteria. Refer to the various options like Astrology School Settings and the choices in the Options menu. Check also the applications Screen Help (see the Help menu). Note that the various Infociel and Special Uranian Astrology program contain only options related to their specialized area.
To
access printed help for installing and using your program, you can also
download and then consult a program User Guide in PDF
format. To do this, go to your internet access/browser program, and use
the following link: http://www.aureas.eu/Manual87US.pdf
In the Demo, you also have access to a Tutorial from the program Help
menu, How to use the software, Training
lessons.
Selection and testing of another software:
If
you want to test another program than the one you selected at the
beginning, simply exit/quit the program and restart the Demo: you will
get again the window allowing to choose the program you want.
It is also possible, without leaving the Demo, to select another
program: for this, go to the Options menu
and select Other demos.
Uninstall the program:
To
properly deinstall the program, you must first shut it down.
Then click on the Start button, select All
programs, then the Aureas v8.7 group, and click on Uninstall
Aureas v8.7.
Other method: click the Start button and select Control Panel. In the Control Panel icons, double-click on the choice « Add/Remove programs » if you are using Windows XP. With Vista or Seven, select « Programs and features » if you are using the Classic view of the Control panel, or click on the Uninstall a program option under the "Programs" category with the usual view. In the list of programs that appears, click on the « Aureas v8.7 » item, then on the Remove button (XP) or Uninstall button (Vista/Seven).
At the end of this procedure, your astrological application will be deleted from your hard drive, except for some personal files that are located in the "Aureas85" directory of the "My documents" directory ("Documents" with Vista / Seven). If you don't want to keep them, delete them manually.
We
recommend you to use only one of the above method to make a full
deinstallation of the program.
| Home Page |